The reinforcement covering is required for the following reasons:
a. Protection of reinforcement from corrosion (rusting).
b. The need for adequate adhesion between the steel and concrete.
c. Fire protection: the concrete that covers reinforcement protects it from deformations caused by the development of high temperatures due to fire in the building.
Generally coverings secured by the use of plastic spacers have a considerable material pro-curement cost as opposed to their low implementation cost.
Of course it is possible to use other “common” materials as well, like pieces of marble. These although they have a low procurement cost their implementation is economically demanding. However, their largest problem is their correct application since they are placed after the posi-tioning of reinforcement and prior to the concrete casting.
In cases where visible concrete surfaces (off-form concrete or architectural concrete) is re-quired, one may use point or linear spacers made out of fiber reinforced concrete or even rebar chairs with fiber reinforced concrete tipped legs.
Covering of slabs lower reinforcement
The minimum required cover depth for slab reinforcement usually ranges between 20 and 30 mm depended on the environmental conditions present throughout the building’s service life. The 20 mm would apply to a dry climate and the 30 mm to a seaside location.
The required covering is achieved only with the use of special stand-offs, called spacers. These must not be affected by corrosion and should be placed approximately every 1.00 m.
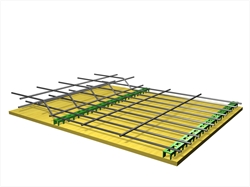 Cover depth of the slab’s lower reinforcement is secured with the use of plastic spacers.
 Cover depth of the slab’s lower reinforcement is secured with the use of plastic spacers.
The simplest solution for providing the necessary cover depth of the reinforcement is special plastic spacers like the ones shown in the above figure. Usage of steel rebar spacers is forbid-den as they are highly susceptible to corrosion.
When rebars corrode the resulting volume expansion leads to concrete spalling and conse-quently to the cracking of the plaster. Extensive deterioration affects not only the occupants’ safety but also the structure’s service life.
Ensuring the slab’ upper reinforcement position
The position of the upper (negative) slab reinforcement, either placed in the support between two slabs or in the support between a slab and a balcony (cantilever slab), can be secured only with the use of special rebar chairs.
In the continuous slab with the cantilever, shown at the picture below, the proper upper rein-forcement positioning is achieved by three ways:
(a) directly on the formwork with the use of rebar chairs
(b) indirectly with the use of folded mesh spacers
(c) indirectly with the use of S-shaped mesh spacers
Prefabricated element, made out of a thin steel rebar with plastic tipped legs in order to prevent corrosion of the support area between the rebar chair and the formwork.
Indirect, S-shaped mesh spacer.
Prefabricated, comes in packages of straight lengths. It is formed in an S shape during the im-plementation.
Indirect, folded mesh spacer.
It is easily formed by folding wire of a standard wire diameter mesh e.g. O/200, to the desirable height. In cases of cantilevers apart from the spacer it can be used as “J-pin” reinforcement, necessary for the cohesion of the free edges.
Indirect “J-pin” rebar chair.
For sheer use in slabs’ free edges.
In cases where mesh is used as upper reinforcement in a slab support, its position can be se-cured with the use of an S-shaped mesh spacer placed on the lower reinforcement grate along the length of the plastic spacer.
In cases where support upper reinforcement comes from bend up span rebars, its proper placement is achieved by the reinforcement bending and therefore bar chairs might not be nec-essary.
Two indirect S-shaped mesh spacers are placed to the left support of the continuous slab. These are fitted upon the lower reinforcement grate along the length of the linear plastic spac-ers.
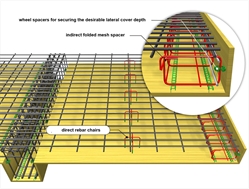 Support of the negative slab’s reinforcement with rebar chairs and folded mesh spacers
 Support of the negative slab’s reinforcement with rebar chairs and folded mesh spacers
In the right support (cantilever balcony) of the above continuous slab, two rows of spacers are placed. The first row consists of indirect folded mesh spacers fitted upon two longitudinal plastic spacers and the second row consists of a number of direct rebar chairs.
It is mandatory to prevent the folded mesh spacer from lateral slipping and this can be achieved with the use of local spacers. They must be placed right after the implementation of the folded mesh spacer and prior to its tieing with the slabs’ reinforcement. When using disk spacers extra attention should be paid to their vertical placement so as to avoid drifting during concreting. However when they are used in slab edges (as shown in the above figure) they can be horizon-tally placed since concrete does not fall directly upon these areas.
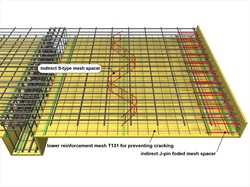 Support of the negative slab’s reinforcement with indirect S-shaped mesh spacers and folded mesh spacers
 Support of the negative slab’s reinforcement with indirect S-shaped mesh spacers and folded mesh spacers
Alternatively, when having a light-weight steel mesh as the lower reinforcement of a cantilever it is recommended to use indirect S-shaped mesh spacers instead of direct rebar chairs. In that case it is more practical to place a “J-pin” mesh spacer inside which the mesh will be properly positioned.
Another solution, even when there is reinforcement mesh on the lower side of the slab or the cantilever, is the use of direct rebar chairs rather than indirect S-shaped mesh spacers.
Use of steel rebar chairs directly placed upon the formwork is strictly forbidden and furthermore the use of old type impromptu spacers is more expensive.
Beam reinforcement covering
The minimum required cover depth for beam rebars usually ranges between 25 and 35 mm de-pended on the environmental conditions present throughout the building’s service life. The 25 mm applies to a dry climate and the 35 mm to a seaside location.
Beam stirrups should be supported at the base of the beam, by a uniform inactive bar since all reinforcement loadings are transferred to these areas.
Lateral cover depths should be created with the use of special plastic spacers. When using stir-rup cage it is wiser to place the disk spacers upon the connecting rebars in order to secure their position during concrete casting.
Lateral spacers do not bear any loads, therefore it not necessary for them to be heavy duty. Moreover they should be placed after the implementation of the stirrup cage inside the beam’s formwork and prior to the tieing of the beam’s rebars to the slabs reinforcement.
The use of lateral longitudinal plastic bars (like the ones placed at the bottom part of the beam) creates two problems: a) it does not enable the implementation of the stirrup cage inside the beam’s formwork and b) it obstructs the proper concrete casting of the beam. If the stirrup cage has been industrially producted, it will have secondary longitudinal connecting bars. In such a case, pieces of vertically fitted plastic bars may be used.
Column reinforcement covering
The minimum required cover depth for column rebars usually ranges between 25 and 35 mm depending on the environmental conditions present throughout the building’s service life. The 25 mm apply to a dry climate and the 35 mm to a seaside location.
Forming the desirable covering of column reinforcement is quite a simple task. For example, four (4) individual spacers placed at the column’s upper part, are enough since the column’s base rebars are tied together in the lap-splice areas.
Especially for columns, the use of spacers for creating the required cover depth helps in the proper centering of the vertical rebars. Therefore when the reinforcement of the next storey is being placed no extra time (with a corresponding additional cost) will be spent in bringing the rebars to their proper position.
Covering can be secured either with disk spacers placed on the upper part of rebars (in that area there is no danger of drifting during the concreting) or with the use of vertical disk spacers fitted upon the stirrups or finally with the use of plastic pieces vertically positioned upon the formwork.
In every case though, spacers must be fitted after the positioning of the stirrup cage in order to facilitate the implementation of the cage and the proper centering of rebars.
Shear wall reinforcement covering
As far as the integrated columns of the shear wall edges are concerned, the required cover depth is the same as the columns’ reinforcement covering. As far as the wall body reinforce-ment is concerned, its cover depth is created according to the following:
After forming the back of the wall, plastic tracks are nailed upon the formwork. These tracks have a usual length around 2.0 m and they can be used as one single piece or separate smaller pieces.
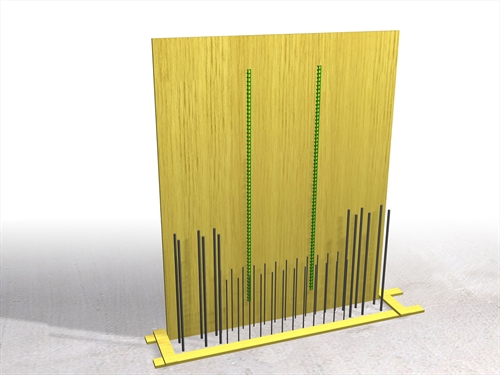 The two longitudinal track spacers are nailed upon the formwork
 The two longitudinal track spacers are nailed upon the formwork
After this, follows the implementation of the column edge, of the body reinforcement and of the spacers that are fitted upon the internal reinforcement grate. That way after the placement of the formwork’s last piece the required cover depth and the proper centering of the reinforcement will be secured.
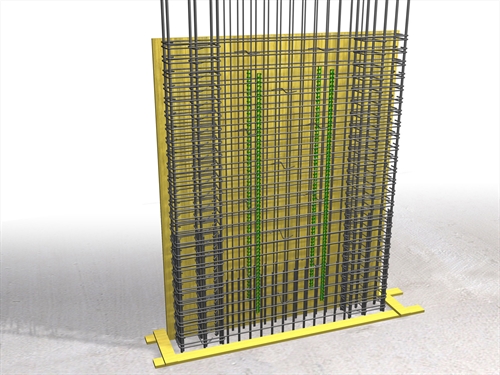 After the reinforcement implementation and prior to ‘closing’ the shear wall’s formwork, the two plastic tracks are tied upon the inner reinforcement grate.
 After the reinforcement implementation and prior to ‘closing’ the shear wall’s formwork, the two plastic tracks are tied upon the inner reinforcement grate.
In shear walls the most effective way for reinforcement implementation is to place the rein-forcement before the assembling of the formwork. In that case, spacers are fitted upon the re-bars.
Foundation reinforcement covering
The minimum required cover depth of the foundation reinforcement is around 40 mm for founda-tion positioned on ground leveling slab and around 70 mm for foundation positioned directly upon the ground.
The construction of foundation directly upon the ground’s surface is allowed only in special cas-es. The sub-slab ensures many things like:
1) comfortable area to work on
2) capability of accurate marking of the areas of footings and columns
3) a stable substrate on top of which spacers will be placed
4) avoidance of a muddy foundation ground due to water usage or possible rain
The required covering may be created by point or even better by linear spacers. Because of the weight they bear and due to their required height, it is recommended to use heavy duty spacers.
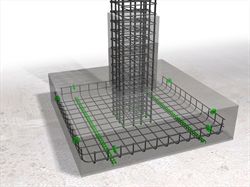 Securing the cover depth of the spread footing’s reinforcement with plastic spacers
 Securing the cover depth of the spread footing’s reinforcement with plastic spacers
Use of spacers on the sides of the footings is obligatory in order to prevent rebars from slipping. Since they do not bear weight, they can be sparsely placed and they should be fitted vertically to avoid drifting during the concreting process.
Ensuring the proper position of upper reinforcement in foundation slabs
In cases of total or partial raft foundation or when constructing the bottom slab of a pool, the use of rebar grid as upper reinforcement is necessary.
Just like in superstructure slabs, in the areas around the slab edges, “J-pin” rebars may be combined with open or closed reinforcement mesh.
In the intermediate area, the required cover depth can be created with the use of special steel rebar chairs placed on top of the lower reinforcement grate.
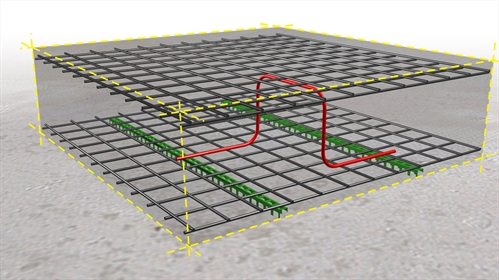 The upper foundation grate is supported by steel spacers, which are positioned upon the lower grate
 The upper foundation grate is supported by steel spacers, which are positioned upon the lower grate